

Wall-mounted cat furniture is the fastest-growing sub-segment in our category — expanding at an estimated 12–15% a year. It is also the one where installation hardware dominates the negative reviews.
On a leading wall-shelf set on Amazon US, buyers mention "screw quality" 25 times — 19 negative to 6 positive. "Hold" is mentioned 27 times — 17 negative to 10 positive. One verified review puts it plainly: "Drywall anchor will not hold the unit up. With the weight of a cat it won't hold up." And on the US CPSC incident database, wall-mounted cat units failing and falling — ripping drywall on the way down, sometimes with the cat on board — is a documented, repeating pattern.
In almost every one of those cases, the screw itself was adequate. The wall and the screw simply didn't belong together.
This guide is built for buyers and importers. Eight common wall surfaces, the anchor each one needs, what goes in the carton, and what your instruction sheet has to say.
The one rule
The wall decides. The screw doesn't.
The same M8 nylon plug holds roughly three times more in dense concrete than in aerated block, and almost nothing in drywall. So the order of decisions is always:
Identify the substrate → calculate the real load → then pick the anchor.
Working backwards — choosing a bolt first and hoping — is where failures come from.

Step 1: What's actually behind the wall?
Your customer doesn't know, and guessing is what causes returns. Teach them to find out in 30 seconds.
- Tap it. Solid sounds dull, hollow has a slight echo.
- Probe it. Drill a 5 mm pilot hole. If it breaks through into a void after about 100 mm, it's a cavity wall.
- Read the dust. Fine pale powder = aerated block. Red or grey grit = brick or concrete. Large crumbs = hollow block. Paper-facing or white powder = drywall.
Where the substrate still isn't certain — and especially with masonry, where strength varies far more than in concrete — a proof-load test on the actual wall is the only way to know what a fixing will really hold. The standard method for that is ASTM E3121, Standard Test Methods for Field Testing of Anchors in Concrete or Masonry. If you ship into markets with older or non-standard housing stock, tell your customer this is an option; it moves the argument from opinion to measurement.
Step 2: Match the anchor to the wall
| # | Substrate | Specify this | Capacity* |
|---|---|---|---|
| 1 | Concrete | Metal sleeve anchor (M6/M8 light, M10/M12 heavy); chemical anchor above 25 kg | 100% |
| 2 | Natural dense stone | Metal sleeve anchor; edge distance ≥ 100 mm. Soft, veined or cracked stone → chemical anchor | 90–100% |
| 3 | Lightweight concrete | Long frame plug (50–80 mm). If the block is hollow, treat as #6 | 50–70% |
| 4 | Solid brick | Nylon plug + screw. Land on the brick, never the mortar joint | 60–80% |
| 5 | Solid sand-lime brick | Long frame plug. Brittle — no oversized expansion | 60–80% |
| 6 | Hollow concrete block | Toggle / butterfly anchor; chemical anchor with mesh sleeve | 30–50% |
| 7 | Aerated concrete (AAC / aircrete) | Dedicated AAC spiral anchor; chemical anchor above 10 kg | 20–35% |
| 8 | Drywall (gypsum board) | Fix into the stud. If not possible, a dedicated board anchor | Very low |
* Same size and embedment, dense concrete = 100%. Indicative only — not certified design values.
The eight wall types, one by one
1.Concrete

The strongest base material you'll meet. Use a metal sleeve anchor: M6/M8 for wall beds and steps, M10/M12 for large multi-level climbers. Above roughly 25 kg, or anywhere the load is overhead, switch to a chemical anchor. Hammer drill (SDS) required, and the drill bit diameter must match the anchor diameter exactly. Sequence: drill → clean → install.
2.Natural dense stone

Also a metal sleeve anchor, but stone is brittle and has no ductility. Keep edge distance at 100 mm or more and drill away from natural veining or fissures — marble in particular has unpredictable local weakness. Where the stone is soft, cracked or marble, use a chemical anchor, which transfers load without expansion pressure.
3.Lightweight concrete

Denser and stronger than aerated block, so ordinary plugs will grip. Specify a long frame plug (50–80 mm) for a larger contact area. One caution: many "lightweight" blocks are hollow. If the probe test breaks through into a void, follow #6 instead.
4.Solid brick

Use a nylon plug with a matched screw rather than a metal bolt — it expands gently instead of cracking the brick face. The critical detail: land on the brick, never in the mortar joint. If your drill suddenly loses resistance, you're in the joint — move over and re-drill.
5.Solid sand-lime brick

Same logic as solid brick, with a long frame plug for a longer expansion zone. The material is brittle, so avoid oversized metal expansion anchors. This applies to the solid variety; perforated sand-lime brick is a hollow substrate and follows #6.
6.Hollow concrete block

There is no solid face for a standard plug to expand against — it only crushes the face shell and has almost no holding force. Two reliable options: a toggle / butterfly anchor whose metal wings open against the back face of the cavity, or a chemical anchor with a mesh sleeve that keeps resin inside the block instead of letting it drain into the void.
7.Aerated concrete (AAC / aircrete)

The single biggest source of complaints. AAC is roughly 400–800 kg/m³ — soft and porous. Three hard rules: no standard plastic plugs (they spin in the hole), no metal expansion bolts, and no hammer mode (percussion shatters the cellular structure around the hole). Use a dedicated AAC spiral anchor whose helical ribs cut a positive fit into the block; above 10 kg, a chemical anchor.
8.Drywall (gypsum board)

The board itself carries essentially no load, so the answer is not a better plug — it's a different strategy:
- Fix into the stud (best by far). Timber studs usually at 400 or 600 mm centres, metal at 600 mm. Locate with a detector and drive a screw straight through the board. No plug needed, and capacity becomes that of the stud.
- Dedicated board anchor when no stud is reachable: self-drilling plastic ≈ 25–30 kg, metal cavity (Molly-type) ≈ 20–40 kg, toggle / butterfly up to 70 kg.
- Heavy units: span several studs with an 18 mm plywood spreader board and mount the product to that.
Two notes for import programmes. Avoid spring toggles where the load direction can change — the wings can fold back. And in older properties (pre-1950s US, much of pre-war Europe) the surface may be lath-and-plaster or solid plaster, not gypsum board: use self-drilling metal anchors, because plastic plugs designed for board will not bite into plaster.
Sleeve or wedge? Sleeve, for this category. A wedge anchor carries 40–60% more load, but concentrates all its force in a clip at the hole bottom — it only works in solid concrete, is permanent once set, and needs a calibrated torque wrench. Wall-mounted cat furniture gets fitted across mixed substrates and often moved. The sleeve anchor is the sensible default.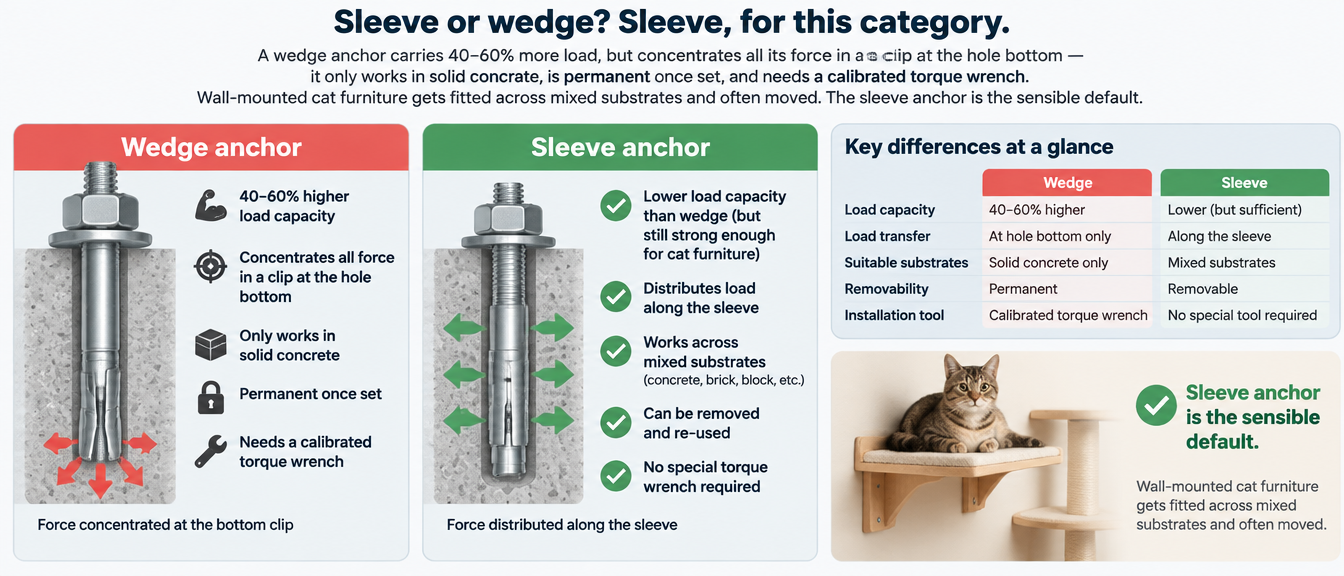
Step 3: Size for impact, not for weight
This is the step most buyers skip, and it's the one that separates cat furniture from an ordinary wall shelf.
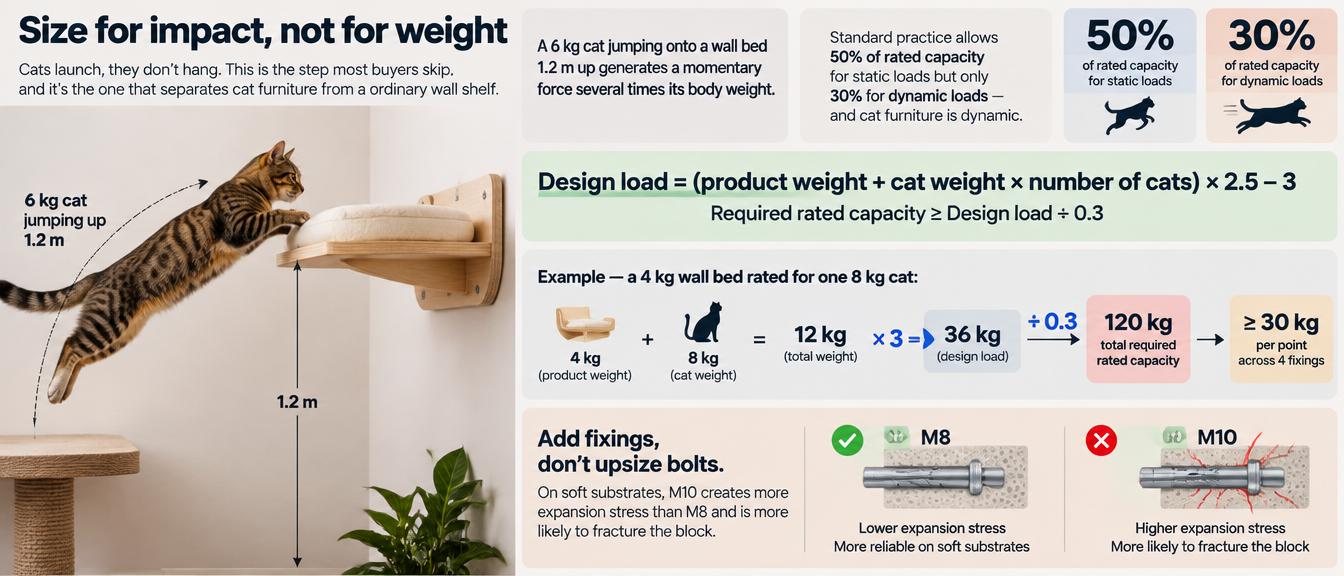
Cats launch, they don't hang. A 6 kg cat jumping onto a wall bed 1.2 m up generates a momentary force several times its body weight. Standard practice allows 50% of rated capacity for static loads but only 30% for dynamic loads — and cat furniture is dynamic.
Required rated capacity ≥ Design load ÷ 0.3
Example — a 4 kg wall bed rated for one 8 kg cat:
Anchor manufacturers publish the ultimate load an anchor survived in laboratory testing, then recommend working well below it — Toggler, for example, sets the recommended safe working load at one quarter of that ultimate value and notes that load falls further as the fixture moves away from the wall.
That margin is not as generous as it sounds. Independent pull-tests routinely record failure loads well above the packaged rating — Family Handyman's HomeLAB test, for instance, measured a heavy-duty toggle rated at 80 lb holding 180 lb before the rig ran out of travel. The spread between rated and actual load is wide, but it is not a licence to undersize: it varies by anchor, by wall condition and by how far the load sits off the wall, which is exactly why the ÷0.3 factor above exists.
What to put in the box
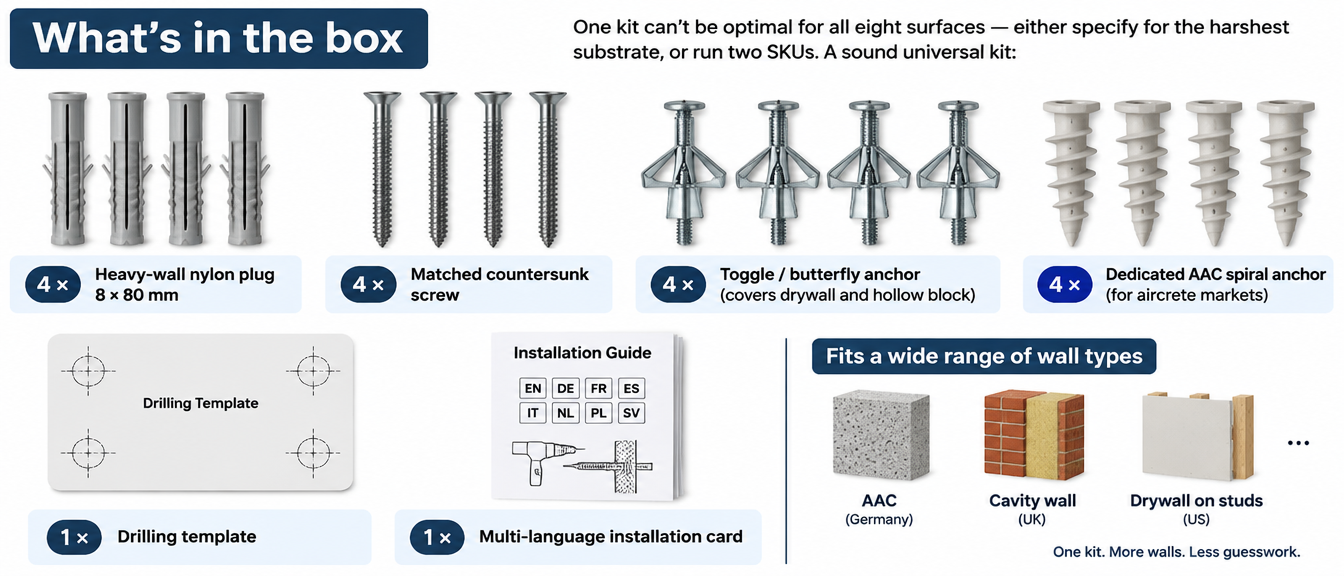
Germany is AAC, the UK is cavity wall, the US is drywall on studs. One kit can't be optimal for all eight surfaces — either specify for the harshest substrate, or run two SKUs.
A sound universal kit:
- Heavy-wall nylon plug 8 × 80 mm × 4
- Matched countersunk furniture screw × 4
- Toggle / butterfly anchor × 4 (covers drywall and hollow block)
- Dedicated AAC spiral anchor × 4 (for aircrete markets)
- Drilling template × 1
- Multi-language installation card × 1
What to write in the manual
- The 30-second wall self-check (tap, probe, read the dust).
- Unsuitable walls, stated plainly. Single-layer drywall with no stud access, powdering or aged surfaces, external insulation finishes.
- Material by environment. Electro-galvanised indoors; hot-dip galvanised for humid or semi-outdoor; 304 stainless for balconies and coastal markets.
For professional and contract buyers, add one line that separates you from hobby sellers: state that anchors should carry independent assessment — an ICC-ES evaluation report (ESR) in North America, or an ETA with a Declaration of Performance in Europe, where selection follows BS 8539, the code of practice for the selection and installation of post-installed anchors in concrete and masonry. Buyers who import for resale are increasingly asked for this by their own insurers and retailers.
That last point protects you twice: it prevents rust complaints, and under GPSR, misleading or incomplete installation instructions are a compliance exposure in their own right. For safety-relevant fixings, ask your anchor supplier for the ETA document or DoP and keep it on file.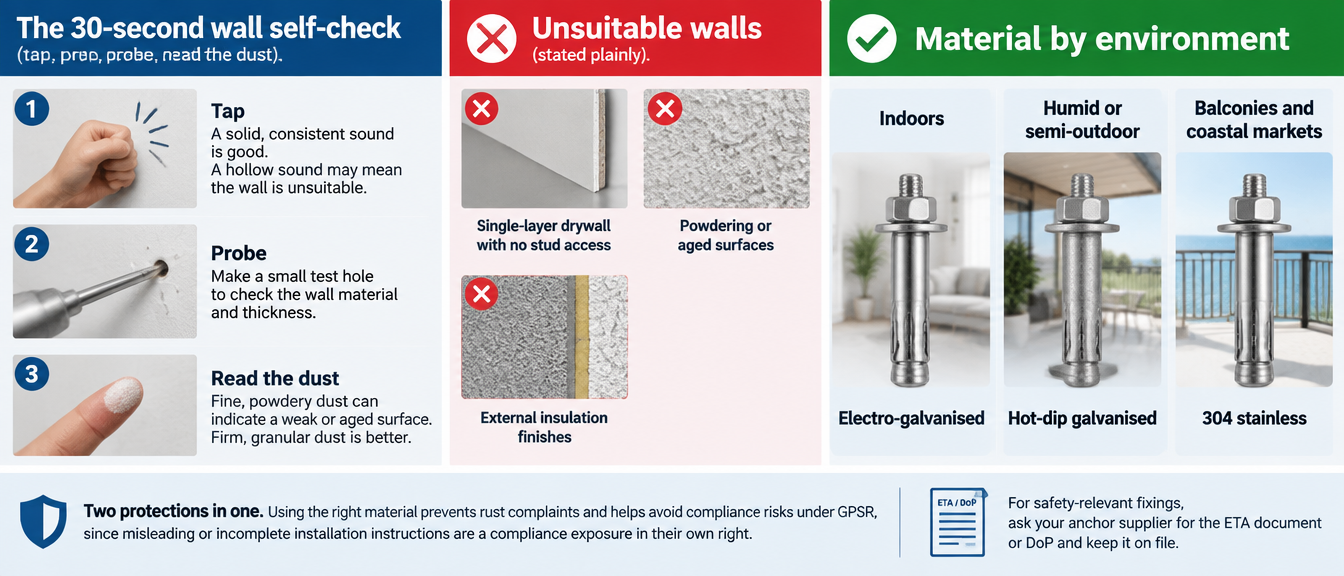
Five installation rules
Break any one and you can halve the capacity:
- Match the hole diameter exactly. Too large and the plug spins; too small and it splits the wall.
- Drill 5–10 mm deeper than the plug. Tape a depth mark on the bit.
- Clear the dust. Residue cuts holding force by 30–50%. Blown, brushed and blown again is the sequence used in the Hilti Anchor Fastening Technology Manual (PDF); it is the single step most often skipped and the one that costs the most capacity.
- Clear the dust. Residue cuts holding force by 30–50%.
- Keep ≥ 50 mm edge distance (75–100 mm in concrete).
- No hammer mode in AAC, hollow block or drywall. Rotary only.
The short version
| Question | Answer |
|---|---|
| What decides holding power? | The substrate, not the screw |
| Strongest substrate? | Concrete — and the only one where a wedge anchor makes sense |
| Biggest single risk? | AAC and hollow block — never ship standard plugs or metal bolts |
| Sleeve or wedge anchor? | Sleeve. Wedge is stronger but solid-concrete-only and permanent |
| How much safety margin? | Dynamic load: design to 30% of rated capacity |
| Better than a bigger bolt? | More fixing points |
| Drywall? | Stud first, dedicated anchor second |
| Outdoor? | 304 stainless |
Anchor reliability = substrate identification (40%) + load calculation (30%) + installation discipline (30%). Treat the hardware kit and the instruction sheet as part of the product, not as packing accessories — it's the cheapest way to cut returns and build a brand that feels dependable.

